This is the first opportunity I have had to see or install the shiny new GSD 24 Garmin sounder module. This model is replacing the venerable GSD 22 which has been around for a few years now. Before you buy the GSD 24 check first for compatibility if you are planning on using your boat's existing transducer.
Lets start off with what you get in the box. The first thing I noticed is the new GSD 24 is larger, and notably heavier than its predecessor. You get almost everything you need to install the unit, including update software which most will need, a marine network cable, and what I will just call the "Magic Box."
Lets start off with what you get in the box. The first thing I noticed is the new GSD 24 is larger, and notably heavier than its predecessor. You get almost everything you need to install the unit, including update software which most will need, a marine network cable, and what I will just call the "Magic Box."

Magic box is the right word, because it allows you to use most, but not all Airmar transducers already installed on your boat, by cutting off the connector, and connecting the wiring onto terminals inside the box. In my case the existing transducer was a Northstar transducer, which loosely translates to an Airmar 744V with a Northstar connector on the end.
The process is straight forward. Start first by identifying your transducer. Airmar placed a tag, and it's a sturdy one, on the wire either up by the connector, or down near the transducer that at the minimum will have a part number. If the actual model number is not on the tag, (In this case the model number is a Triducer B744VL) you can go to Airmar's website and search for the part number. If the tag is missing, check with the old sounder module manufacturer for a list of compatible transducers to narrow the search, or call the boat builder if it was original equipment installed on the boat. Now if any of that didn't work, call Garmin, and or Airmar, and get some advice. Airmar did make a handful of transducers with special features for some manufacturers, that also may, or may not work. In this category are all Raymarine transducers which use a special sense feature. These units are not compatible. Some smaller Lowrance, and Hummingbird transducers are not compatible, along with all side scan transducers. The good news for most users is you will not have any problems.

Without trepidation, lop off the connector, and strip the wiring back about 5". The manual says 3 1/2 inches, but since you're going to strip the wires after you pass them into the box, don't stint, cutting them too short makes them harder to work with, and there is lots of room for them in the little box. There are two pass through fittings, well in my case three. Two smaller, but identical ones you see in the picture, and a third, and larger one installed on the little box. I will save you some effort right up front, the larger dual (Siamese) Airmar cables, will only pass through the larger fitting. Strip off a fat 1/4" of the sheath, and terminate the wires on the block following the wire color tables in the instructions. The wire color tables are not numbered, but are in the correct 1 though 8 order. Another small note is with the Airmar 744vV transducer you will have two bare wires. Twist them together and they both will go to terminal 3 in the magic box. Seal the magic box up, plug it into the module and you're done.

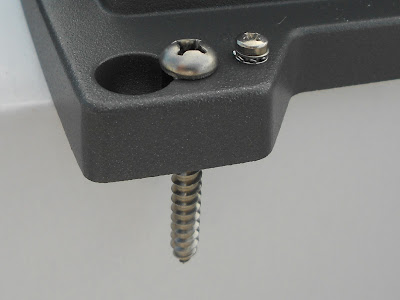
One of my personal gripes with both the new GSD 24, and the Raymarine DSM300 modules is they use a slotted hole mounting feature that pushes you to mount the unit with the cables hanging down from the units. What happens is that in many cases if the status light is facing down, it can be very difficult to see the light's indications. I wish that both of these modules just had round fastener holes in them that easily allowed mounting in any orientation. The provided mounting screws are overly long, and you will probably have to replace them with much shorter ones. The other small screw you see in the picture is the ground for the shields (bare wires) in the transducer cable. Use it.
With the box in place, hopefully with an easily visible status LED, the rest is plug and play. The power cable gets wired, the magic box plugs into the XDCR connector, and the marine network cable goes to an available MFD network plug.

One last step to go now. Turn on your Garmin gear, and take the provided software upgrade chip, and upgrade the system. Once that's done, switch to the sounder page, and prepare to be be amazed. The image is stunning, and the detail is the best of any non-chirping system I have personally seen to date. I don't typically do product testing and reviews, and I'm not starting today. If you would like to see some really good screen shots of the GSD 24 being contrasted with the GSD 22, there is a really good slide show at Spearfish Planet. The improvements in the GSD 24 over the GSD 22 are substantial indeed.
The process is straight forward. Start first by identifying your transducer. Airmar placed a tag, and it's a sturdy one, on the wire either up by the connector, or down near the transducer that at the minimum will have a part number. If the actual model number is not on the tag, (In this case the model number is a Triducer B744VL) you can go to Airmar's website and search for the part number. If the tag is missing, check with the old sounder module manufacturer for a list of compatible transducers to narrow the search, or call the boat builder if it was original equipment installed on the boat. Now if any of that didn't work, call Garmin, and or Airmar, and get some advice. Airmar did make a handful of transducers with special features for some manufacturers, that also may, or may not work. In this category are all Raymarine transducers which use a special sense feature. These units are not compatible. Some smaller Lowrance, and Hummingbird transducers are not compatible, along with all side scan transducers. The good news for most users is you will not have any problems.

Without trepidation, lop off the connector, and strip the wiring back about 5". The manual says 3 1/2 inches, but since you're going to strip the wires after you pass them into the box, don't stint, cutting them too short makes them harder to work with, and there is lots of room for them in the little box. There are two pass through fittings, well in my case three. Two smaller, but identical ones you see in the picture, and a third, and larger one installed on the little box. I will save you some effort right up front, the larger dual (Siamese) Airmar cables, will only pass through the larger fitting. Strip off a fat 1/4" of the sheath, and terminate the wires on the block following the wire color tables in the instructions. The wire color tables are not numbered, but are in the correct 1 though 8 order. Another small note is with the Airmar 744vV transducer you will have two bare wires. Twist them together and they both will go to terminal 3 in the magic box. Seal the magic box up, plug it into the module and you're done.

One of my personal gripes with both the new GSD 24, and the Raymarine DSM300 modules is they use a slotted hole mounting feature that pushes you to mount the unit with the cables hanging down from the units. What happens is that in many cases if the status light is facing down, it can be very difficult to see the light's indications. I wish that both of these modules just had round fastener holes in them that easily allowed mounting in any orientation. The provided mounting screws are overly long, and you will probably have to replace them with much shorter ones. The other small screw you see in the picture is the ground for the shields (bare wires) in the transducer cable. Use it.

With the box in place, hopefully with an easily visible status LED, the rest is plug and play. The power cable gets wired, the magic box plugs into the XDCR connector, and the marine network cable goes to an available MFD network plug.

One last step to go now. Turn on your Garmin gear, and take the provided software upgrade chip, and upgrade the system. Once that's done, switch to the sounder page, and prepare to be be amazed. The image is stunning, and the detail is the best of any non-chirping system I have personally seen to date. I don't typically do product testing and reviews, and I'm not starting today. If you would like to see some really good screen shots of the GSD 24 being contrasted with the GSD 22, there is a really good slide show at Spearfish Planet. The improvements in the GSD 24 over the GSD 22 are substantial indeed.
Excellent job Garmin. And for Jim, it was worth the wait, you will love it.
Do you think Garmin's are better than others?
ReplyDeleteHello is it posible to conect it direkt into the garmin chart plotter 8 pin ? after
ReplyDeleteBr E
Is the gsd 24 compatible with the GPS maps 840 xs
ReplyDeleteUnfortunately no. Only the GCV10 is.
Delete